Our push fold charts are designed to help you decide which Texas Hold’em hands to go all-in with and which hands to fold when your stack falls to under 20 big blinds.
Learning these hand ranges and applying them in the game will help you dominate your games and get better results in late-stage play, whether you are playing for micro stakes or against the best players in the world.
We will introduce you to shove fold charts for different stack sizes and positions, teaching you which hands are good enough to go all-in in every single scenario. Here are the two most common push fold charts you need:
- No Antes Push Fold Charts (Download here)
- 10% Antes Push Fold Charts (Download here)
- 12.5% Antes Push Fold Charts (Download here)
Why You Need Push Fold Charts
When chip stacks get short, the decision often comes very simple, as all-in or fold become your only real options.
Our push-fold charts are handy in situations like these, as it would be impossible to calculate your equity on the spot in every hand.
By learning our all-in or fold charts, you will always have the right answer, and you will be able to avoid making costly mistakes when it comes to late-game tournament play.
What are Push Fold Charts
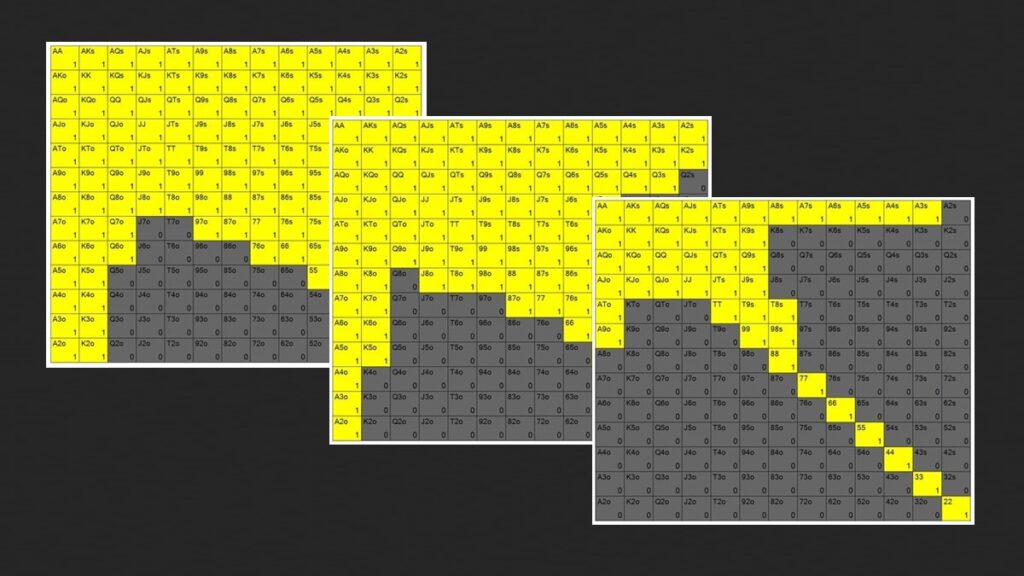
You may be wondering, what exactly are push fold charts? The answer is quite simple! Push fold charts are charts that offer a visual representation of Texas Holdem hands you should be going all-in with from each position and with each possible stack size.
By looking at the chart and cross-referencing the stack size and position you are looking for, you will get a quick answer to your questions.
The ranges in these charts are derived from NASH equilibrium, which means they are the optimal ranges that you should be shoving against anyone.
The farther away from equilibrium your opponents play, the better results you will have by shoving the hands indicated on the charts.
Push Fold Strategy Explained (How the Charts Work)
The push fold tournament strategy is one of the easiest poker strategies to apply. All you need to do is memorize which hands belong to which poker range chart and follow it to the letter.
For example, imagine you find yourself in the cutoff with a stack of 12 big blinds in a tournament with 12.5% antes.
In this situation, all you would need to do is remember which hands on the 12.5% ante chart belong to the cutoff range for 12 big blinds.
A quick look at the charts tells us you should be shoving 33% of all hands, which is a range that includes any pocket pair, any ace, K5s+, KT+, Q8s+, QT+, J8s+, JT+, T7s+, 97s+, 86s+, 76s+, and 65s+.
As your position and your stack size change, all you need to do is follow the chart and see how your range should expand or shrink based on these parameters.
One thing worth keeping in mind is that you should never use the charts while actually playing poker. While this may sound fun, using push fold charts in-game is considered cheating, and the charts should only be used for educational purposes.
Why Push Fold Charts Are So Important
Shove fold charts are the best educational tool for late-game tournament play. Once you learn the charts, you will be able to make optimal play and start making appropriate adjustments depending on other factors.
Without a good understanding of the push fold ranges, however, you will be playing in the dark and guessing which hand makes for a profitable shove instead of knowing it.
These ranges represent your baseline for late-game play and are a necessary part of education for any would-be tournament poker professional.
Tournaments vs Cash Games
If you are wondering whether these charts have any purpose in cash game poker, the answer is yes, under certain circumstances.
The biggest difference between tournament and cash game poker is the average stack depth. Cash game stacks are typically much deeper, which means short stack spots are a lot less frequent.
However, if you play in live cash games where a low minimal buyin is allowed, you may often be up against players whose stacks have shrunk to just a few big blinds.
In situations like these, understanding the push fold charts may come in handy. This is also the case when straddles are on, as stacks can quickly shrink compared to the straddle.
For example, imagine playing in a $1/2 game and having $150 in your stack from your starting $200 buyin. All of a sudden, the two players under the gun post the $5 and $10 straddles, kicking the stakes up for one hand.
While you had 75 big blinds to start with, the straddles have shrunk your stack to just 15 big blinds now. This means the push fold charts come into play, and you can use them to decide which hands you can profitably go all-in with.
However, if you are primarily a cash game player, focusing on other parts of poker education is probably a good idea, and push fold charts are not a tool you necessarily have to use.
How to Use Poker Push Fold Charts
Now that we have explained the reasons you need to use push fold charts are part of your studying routine, let’s talk about how they actually apply to the game.
We will go over the most common scenarios in which you should use the charts, the most important mistakes to look out for, and a few examples of how shove fold charts can help you increase your win rate instantly.
When to Use the Shove Fold Charts
So when exactly do push fold charts come into play? Anytime the effective stack is under 20 big blinds, you can use the ranges found on these charts.
This means that they are useful not only when you have a short stack but also when you are a big stack and facing multiple opponents with a short stack.
For example, imagine you have 60 big blinds in the late stages of a poker tournament. To your left are two players with stacks of 12, 15, and 8 big blinds.
This means anytime you are first to act, and these players are behind you, you can look at the 15 big blind charts to decide which hands you can shove into them.
The optimal shoving ranges will apply the same way, as the effective stack is the one you should always look at instead of your own stack.
Also, keep in mind that these charts look only at cEV and don’t consider ICM. This means that as the player going all-in you will be able to shove even wider once ICM is in play and your opponents are forced to fold more hands as the result of ICM pressure.
Different Stack Depth Applications
Our push fold charts kick into play at 20 big blind stacks. While you can make some all-in plays even with deeper stacks, learning the ranges for stack depths up to 20 bbs is sufficient.
If you look at the charts real quick, you will notice that the hand ranges you can profitably shove from early positions with a stack of 20 big blinds are quite tight. This is because 20 big blinds is a lot to risk, and you should only be doing it with your best hands.
As the effective stack gets shallower, the range of hands you can play from each position expands as winning the blinds becomes more profitable.
For example, if you shove a 5 big blind stack and win the 2.5 bb in the middle, your stack grows by 50%, which is massive.
On the other hand, if you shove 20 big blinds and win the 2.5 bb in the middle, you are only adding 12.5% to your stack, which is significant but not nearly as impactful.
It is also worth keeping in mind that while going all in with certain hands at a stack of 15 or 20 big blinds may be profitable, there may be more profitable plays, such as min-raising with a well-balanced range instead of putting all your chips into the middle right away.
Common Mistakes to Avoid
Our push fold charts can help you instantly improve your tournament poker results, but only if you use them the right way.
Novice poker players who are introduced to the charts often make mistakes that cost them money and negate the charts’ overall positive impact.
When using the charts, here are a few common mistakes you need to avoid making:
- Forgetting About Antes: Push fold ranges can be quite a bit different when antes are in play and when they are not. Make sure to pay attention to whether the antes are on and what percentage of the big blind they are so you can use the appropriate hand ranges.
- Pushing with Bigger Stacks: Our all-in or fold charts define ranges for stacks of up to 20 big blinds. However, this does not mean you have to go all-in every time when you have 20 big blinds and have a playable hand. Also, you should definitely move away from shoving all-in if the effective stack exceeds 20 big blinds.
- Calling with Pushing Ranges: The ranges found in these charts represent the hands you should be going all-in with if you are the first to act. If there is action in front of you or another player goes all-in before you, you should be calling with completely different and much tighter ranges.
Push Fold Chart Examples
The best way to start with push fold charts is by learning some actual ranges by heart. Starting with middling stack sizes is a good idea, as this allows you to expand or shrink ranges in your head and make deductions for other stack sizes even if you don’t know all the exact ranges.
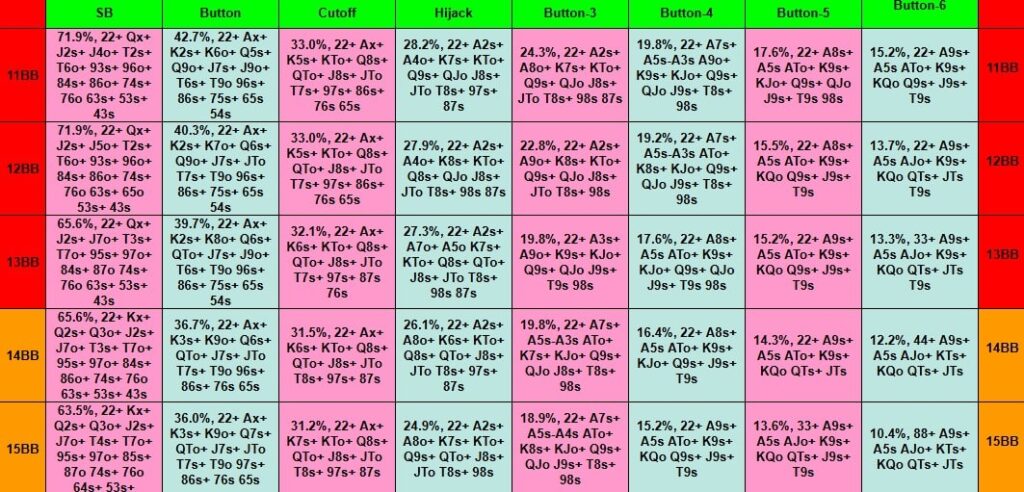
For example, here is a quick look at the 12 big blind hijack range with 10% antes, which includes 26.4% of all hands:
22+, A2s+, A7+, A5, K7s+, KT+, Q8s+, QJ, J8s+, JT, T8s+, 98s, 87s
With just 12 big blinds, it is easy to start panicking and shoving all in with a wide variety of hands in the hopes of taking down the blinds and antes.
Yet, according to the equilibrium strategy, you should only be shoving the hands listed above, which make up a fairly strong range and definitely don’t include any trash.
It is also worth noting that your 12 big blind hijack shoving range should be even much tighter if there are no antes in play, as the optimal range includes only 16.7% hands and looks like this:
22+, A8s+, A5s, A4s, AT+, K9s+, KJ+, Q9s+, QJ, J9s+, T9s, 98s
As you move closer to the big blind, the ranges typically expand, while they shrink as you move away from it.
Likewise, the bigger your stack, the tighter range you should be going all-in with, as your risk-to-reward ratio goes up with every additional player between you and the big blind.
Nash Equilibrium Push Fold Charts for Heads-Up Play
As a tournament poker player, you may not be in a situation to play heads up too often, as being one of the final two players in a tournament is not very common.
Yet, the pay jump between second and first place in a tournament is usually the biggest one, which means being able to play a strong heads-up game can be the decisive factor in some of the biggest moments in your poker career.
For that reason, all top tournament players dedicate part of their studying time to learning heads-up poker and mastering the ranges they should play in those final hands.
The Nash equilibrium push fold charts found here can help you play a perfect heads-up game with a stack of less than 20 big blinds.
By applying the ranges found in these charts, you will ensure that no strategy your opponent applies can exploit your tendencies.
These charts are mathematically perfect, and with no other players to interfere, they can guarantee your all-ins and calls are profitable and unexploitable.
How to Use the Nash Equilibrium Heads-Up Charts
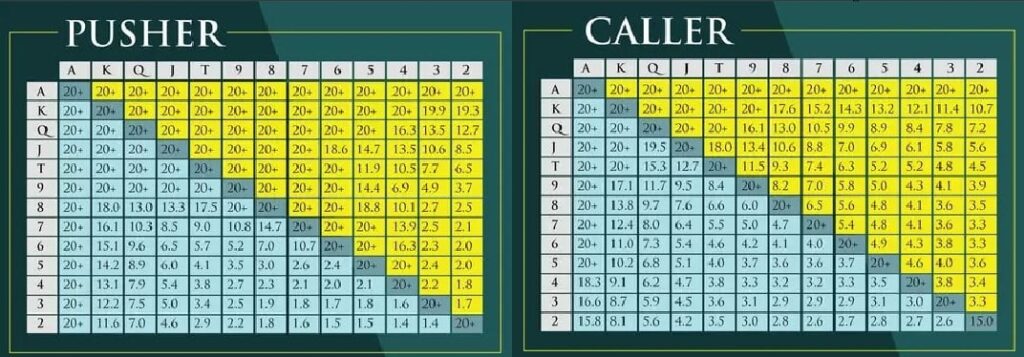
The Nash equilibrium looks a bit different than the other charts on this page. This is because there is no need for many different charts showcasing ranges for different positions.
In heads-up poker, there are only two positions, and there are exactly two Nash equilibrium charts you should learn.
The Pusher chart is used when you are in the small blind and acting first, while the Caller chart is used when you are in the big blind and your opponent goes all-in first.
Each chart includes the entire poker hands grid. You will notice a number inside each field, which represents the maximum number of big blinds you can push or call with a certain hand.
For example, looking at the Pusher chart, you will notice that the 32o field has a number of 1.7. This means you should only push 32o if you have 1.7 big blinds or fewer in the small blind.
On the other hand, each suited ace hand has a number of 20+, which means you can profitably shove a stack of 20 big blinds (and even more) with this hand.
Heads Up Nash Equilibrium Example
Nash equilibrium is a poker strategy that seeks perfect balance. In the long run, two players playing a push-fold game in accordance with the Nash equilibrium will always break even.
You will note that players playing in equilibrium tend to shove and call much wider than you would expect an average player to do.
For example, the chart suggests going all-in for 20 big blinds with a hand like Q6s and 98o. Conversely, the caller should be calling with 33, K9s, and QTs.
Keep in mind that most opponents won’t actually play heads up in a tournament anywhere close to the Nash equilibrium, which means they can be heavily exploited.
For example, if you notice your opponent is folding a lot of small blinds and showing way less than he should, you can tighten up your calling range and keep picking up the blinds in the meantime every time he folds.
On the other hand, if your opponent is folding too much to your shoves, you can expand your pushing range in the small blind and win more chips this way.
Top Tips for Using the Push Fold Charts

Before you enter your next online tournament, you should take some time to study the push-fold charts and learn how to use them.
Here are a few pro tips on using these charts and what adjustments to look for when playing.
Tip #1 – Choose the Right Stack Size
Optimal hand ranges change significantly as the effective stack changes, and it is important to use the appropriate chart for the stack size you are working with.
This is especially the case when you are the big stack, and you don’t pay enough attention to the stacks behind you.
In such cases, it is easy to use the push-fold chart that corresponds to your chip stack but not the stacks of the players behind you.
For example, if you have 20 big blinds on the button, but the two players in the blinds only have 10 and 8 big blinds, respectively, you should be using the 10 big blind charts.
Always make sure to take the time to figure out the effective stack before you make your play, as it could be the difference between winning or losing chips in the long run.
Tip #2 – Position is Key
Position is the most important concept to remember when playing with a short stack in poker tournaments.
With every new hand dealt, you should be focused on what position you are playing from, as this will determine the optimal ranges you should play.
By being positionally aware and using the appropriate push-fold charts, you can make +EV plays across the board and continue accumulating chips deep into the tournament.
Tip #3 – Adjust to Antes
Antes may seem like a small part of the game, but they actually become very important in the late stages of poker tournaments and change the GTO poker strategy significantly.
As you can see from the various push fold charts on this page, profitable shoving ranges change quite a bit when antes are introduced into the game.
As a general rule of thumb, you should be shoving with wider ranges when antes are in play, and even wider ranges if antes represent a bigger percentage of the big blind.
The logic behind this is simple, as the chips you stand to win when antes are in play represent a bigger percentage of your overall stack.
When antes kick in, note this and start pushing wider to pick up those dead chips and grow your stack faster. Check out PeakGTO to learn more about the differences in these situations.
Final Thoughts on Using Push Fold Charts in Your Games
As a tournament poker player, you will often find yourself playing with a relatively small stack. In such cases, all-in or fold will become your only real decision.
Our push-fold charts are designed to help you determine which hands you can shove profitably in different situations, depending on your position and the effective stack.
Take some time to study these poker charts before every session you play, and your late-game results will start improving significantly as you make more +EV plays and win more dead money without any resistance. On the other hand, if you are looking for a guide on how to play with deeper stacks, make sure to check our preflop charts and poker cheat sheet page to learn more.